

Posted by Editorial Team

Instead of lifting your baby out for every short car-to-pushchair transfer, attach a Joie infant carrier to a manufacturer-approved pushchair using the specified adapters. This 2026 workflow explains how to confirm the combination, practise fitting it empty and build a repeatable transfer routine without guessing compatibility.
TL;DR
- Joie car seat to pushchair fitting requires approval for the exact infant carrier, pushchair and adapters.
- For Your Little One travel-system bundles are an alternative starting point, not confirmation that an existing Joie seat fits.
- Practise attachment and removal with an empty infant carrier before transferring your baby.
- Use the manufacturer's instructions for orientation, handle position, locking checks and release controls.
Why this matters
A car seat fitting into a car does not mean it fits onto a pushchair. Vehicle installation and pushchair attachment are separate checks. The pushchair frame, infant carrier and any required adapters must form an approved combination.
A travel system is a pushchair setup that accepts a compatible infant carrier. Some bundles also include a carrycot, which gives your baby a separate lying-flat space when used within its instructions. A bundle name alone does not establish compatibility with a seat you already own.
For Your Little One sells baby essentials including travel systems and car seats. For Your Little One travel-system bundles suit parents starting a complete setup; an existing Joie seat needs separate compatibility confirmation.
For UK journeys in 2026, government child car seat rules require children using height-based seats to remain rear-facing until they are over 15 months old. Children normally need a child car seat until they reach 135cm or their 12th birthday, whichever comes first. These road-use rules do not establish pushchair compatibility or replace your seat's height and weight limits.
Before you start
- Gather the exact model details. Have the Joie infant carrier model, pushchair model and relevant product labels to hand, plus the instructions for both. Confirm that your car seat is a removable infant carrier intended for pushchair use, rather than assuming every Joie seat can leave the vehicle.
- Find the approved adapter information. Check the manufacturer's compatibility information for the exact combination, including the adapter reference where adapters are required. Similar-looking fittings, a shared brand name and the word universal are not sufficient evidence.
- Prepare an empty practice setup. Use a level surface, keep your baby elsewhere with a responsible adult and have every required fitting component ready. The easily missed issue is version compatibility: do not treat a matching product-family name as confirmation that your particular frame and seat version work together.
If the instructions do not clearly confirm the combination, stop before ordering adapters or attempting attachment. Ask the manufacturer to identify the approved components from your model details. Buying a connector that looks right is not a useful shortcut.
Confirm your seat, frame and adapters
The first part of a Joie car seat to pushchair setup is a paperwork check, not a fitting attempt. Record the exact product names and references so you can compare instructions without relying on memory.
Compatibility record
- Find the model identification on your Joie infant carrier. Copy the model name and any version information relevant to its instructions.
- Identify the pushchair frame in the same way. Do not use the name of a seat fabric or accessory as the frame model.
- Check the current manufacturer instructions or compatibility information for the infant carrier and pushchair combination.
- Identify the specified adapters, if required. Check their reference against the approved setup rather than choosing by appearance.
- Read any fitting restrictions, including seat-unit removal, carrier orientation and handle position.
Expected result: you can identify the approved carrier, frame and adapter combination and locate the fitting instructions for it. If you cannot, the setup is not ready for assembly.
Keep this record with your baby-gear instructions. For a 2026 purchase, confirm the model and version being supplied rather than assuming a photograph or familiar range name identifies every component.
Choose the right starting route
There are different ways to organise car journeys and walks. The right choice depends on what you already own and whether its compatibility is documented.
| Route | Best for | Practical benefit | Limitation |
|---|---|---|---|
| Keep your Joie infant carrier and use an approved pushchair combination | Parents with a suitable infant carrier already | Retains an existing seat while adding a transfer routine | Requires exact frame and adapter confirmation |
| Start with a complete travel-system bundle | Parents choosing the main components together | Lets you assess the included setup as a whole | Does not establish compatibility with a separate Joie seat |
| Keep the car seat in the car and transfer your baby | Parents without an approved carrier-to-frame combination | Avoids an unconfirmed attachment | Requires moving your baby between seats |
Keep your Joie infant carrier only when the approved pushchair combination meets your needs. A complete bundle is not automatically better value if it duplicates equipment you can already use. Equally, adapters are not good value when they do not produce a confirmed, usable setup.
Prepare the pushchair frame
Once compatibility is confirmed, prepare the pushchair exactly as its instructions describe. This stage separates frame preparation from carrier attachment, making mistakes easier to spot.
Frame and adapter preparation
- Open the pushchair on a level surface and engage its frame locks as instructed. Check that the frame is fully open before adding another component.
- Apply the parking brake. Keep the frame stationary throughout fitting and removal.
- Remove the pushchair seat unit or other component only if the approved travel-system instructions require it.
- Inspect the attachment points and adapters. Stop if a component is damaged, missing or does not match the specified reference.
- Fit the adapters in the positions and orientation shown in the instructions. Follow any left/right markings that your actual adapters carry.
- Carry out the adapter-locking check specified by the manufacturer. Do not treat a sound alone as proof of correct engagement.
Expected result: the frame is open, braked and prepared for the infant carrier, with the required adapters secured according to the instructions.
Do not add straps, ties, padding or homemade spacers to improve the fit. A correct setup uses the specified attachment components without improvised alterations. If an adapter will not seat correctly, remove it and revisit the reference and orientation.
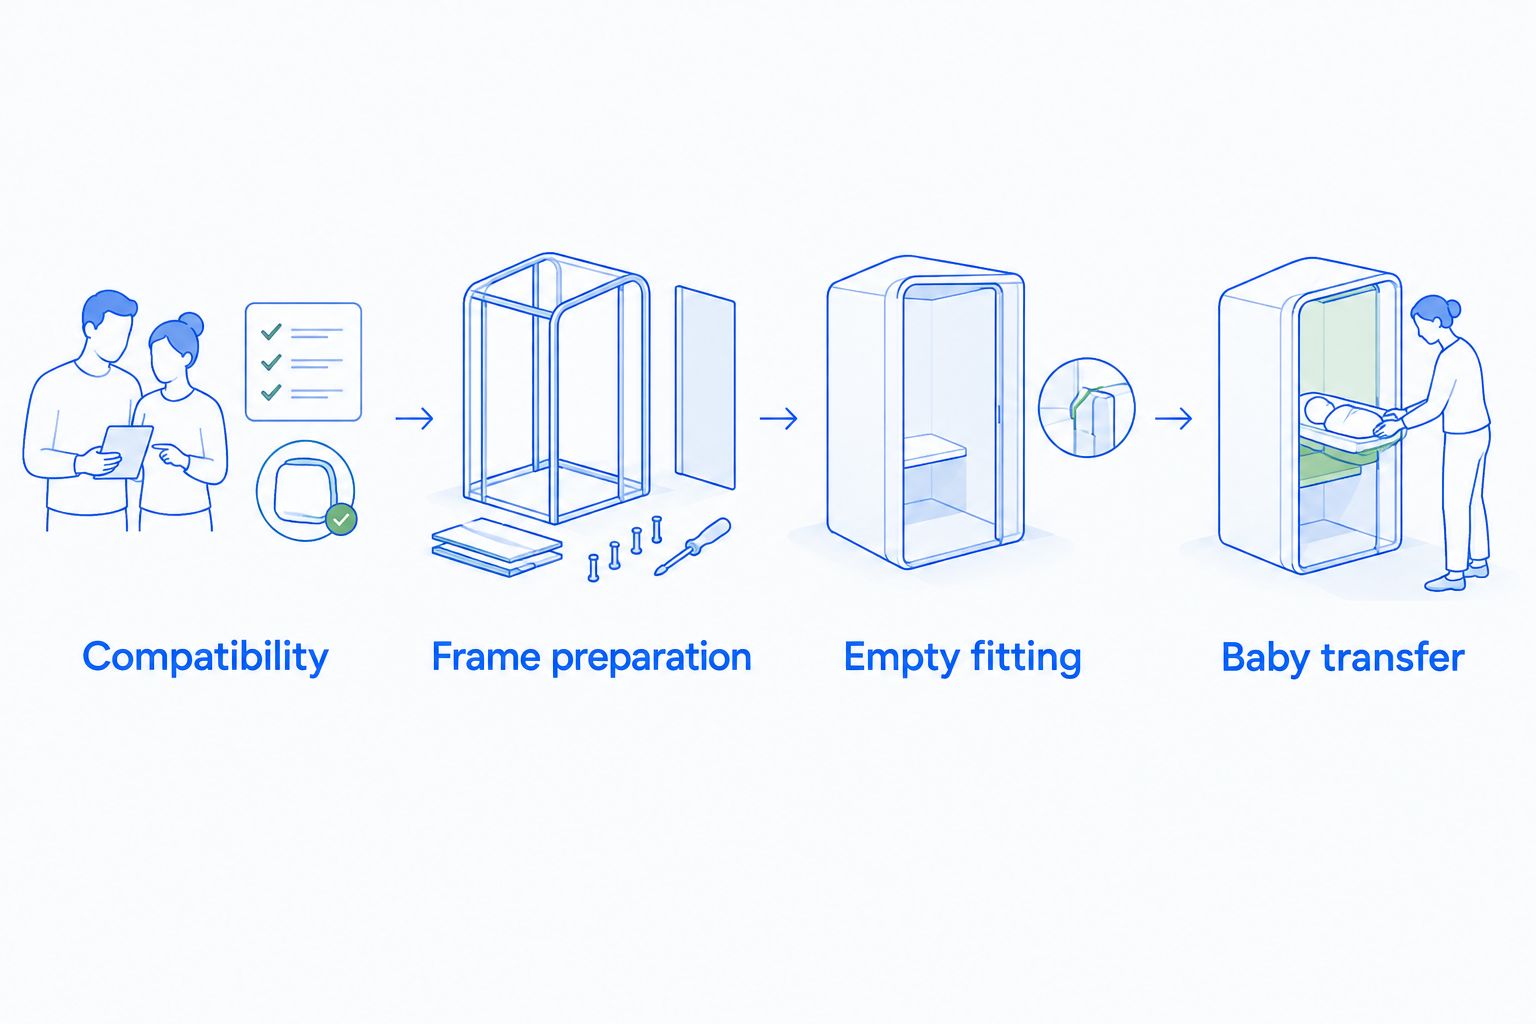
The workflow follows a fixed order: Compatibility, Frame preparation, Empty fitting, then Baby transfer. Complete each stage before moving to the next.
Fit the infant carrier and practise the transfer
Practise with an empty Joie infant carrier first. This lets you learn the attachment and release movement without managing your baby's weight at the same time.
Empty fitting and release
- Put the carrier handle into the position required by the relevant instructions. Carrying position and pushchair-use position are not assumptions to make from appearance.
- Hold the empty carrier as instructed and align its attachment points with the prepared frame or adapters.
- Lower or position the carrier using the movement shown in the manual. Keep fingers, fabric and loose straps clear of the fittings.
- Complete the manufacturer's locking check. Check every attachment point the instructions identify rather than assuming one engaged side confirms the whole seat.
- Check the carrier orientation and handle position again. Use only the configuration approved for that setup.
- Locate the release control shown in the instructions and practise removal while supporting the carrier. Refit it and repeat the required checks until you understand the sequence.
Expected result: you can attach, verify and remove the empty carrier using the documented controls without forcing any part or guessing the release method.
A click is useful feedback only where the instructions identify it as part of the fitting process. The decisive check is the manufacturer's full locking procedure. If the carrier sits unevenly or a connector remains unsecured, remove it and investigate before use.
Car-to-pushchair routine
- Open and brake the compatible pushchair before removing your baby from the vehicle. Position it where you can work without stepping into moving traffic.
- Check your baby remains correctly secured in the infant carrier according to the seat instructions.
- Release the carrier from its vehicle installation using the documented method. Support it using the approved carrying position.
- Attach it to the prepared pushchair using the sequence you practised empty.
- Complete the locking, orientation and handle checks before releasing the parking brake.
- Keep observing your baby's position and comfort. Plan to move your baby into an appropriate separate sleep space rather than treating the carrier as a replacement for a cot or Moses basket.
Expected result: your baby remains secured in the infant carrier, and the carrier is correctly attached before the pushchair moves.
For your 2026 outings, follow the infant carrier manufacturer's guidance on use and breaks. There is no single journey-duration figure that replaces advice for your particular seat and baby; seek individual advice from a health professional when needed.
Second workflow: pushchair back to the car
The return journey needs its own routine. Secure pushchair attachment does not prove that the infant carrier is correctly installed in your vehicle.
- Stop on a suitable surface and apply the pushchair brake before touching the release control.
- Support the carrier and release it using the documented method. Keep loose straps clear of the mechanism.
- Place the carrier into the vehicle using the approved installation method for your exact seat and car.
- If using a compatible base, complete every engagement and indicator check specified in its instructions. If using a seat belt, follow the seat's approved belt route and checks.
- Recheck your baby's harness and the carrier handle position required for vehicle use.
- Fold and stow the pushchair according to its instructions. Remove adapters first if that model requires it.
Expected result: the carrier passes its vehicle-installation checks independently of the pushchair, and the frame is stowed without forcing its folding mechanism.
ISOFIX is a vehicle anchorage system. It does not describe the connectors that attach an infant carrier to a pushchair. Keep the vehicle base and pushchair adapter checks separate.
Troubleshooting
The carrier will not attach
Check the exact carrier, frame and adapter references again, then review orientation and any required seat-unit removal. Do not push harder to overcome an unexplained mismatch. If the approved combination still will not attach, ask the manufacturer to check the setup.
One side engages but the other does not
Remove the empty carrier and inspect both attachment points for trapped fabric, incorrect adapter positioning or damage. Refit according to the instructions and repeat the complete locking check. Do not use the carrier with an unsecured attachment point.
The release control is difficult to operate
Apply the brake and support the carrier before using the release method shown in the manual. Check that you are operating the correct control and following the specified movement. Stop if removal still requires force; do not pry at the fittings.
The pushchair will not fold after removal
Check whether the instructions require adapters or another component to be removed before folding. Clear loose straps and accessories from the folding mechanism. Never force the frame to close around an obstruction.
Your baby slumps or appears uncomfortable
Stop and check your baby's position, harness and permitted insert arrangement against the infant carrier instructions. Do not add unapproved cushions to alter the fit. Seek advice from a health professional if positioning concerns persist; get urgent help for any breathing concern.
Customise your workflow
Build your setup around ordinary journeys, not just the first successful attachment. Check whether you can manage the frame, carrier and required adapters alongside the bags you normally carry.
For Your Little One lists a Cruise 3-in-1 travel system with i-Size car seat in Black Eclipse. Treat it as a separate bundle to assess, not as evidence that the Cruise frame accepts your Joie carrier. Confirm the included components and their instructions before making a decision.
For a 2026 buying checklist, prioritise:
- Compatibility: a documented combination, not a visual match.
- Included items: the components you need without unnecessary duplication.
- Everyday handling: opening, lifting, attachment, release and boot storage.
- Longer walks: an appropriate pushchair seat or carrycot used within its instructions.
- Accessories: items approved for the exact product and intended use.
For Your Little One travel-system shopping should help you compare complete setups, while the Joie manufacturer instructions settle whether your existing infant carrier can join one. Choose the combination that works for your family without buying around an unresolved fit question.
FAQ
How do I attach a Joie car seat to a pushchair?
Attach a Joie infant carrier only to a manufacturer-approved pushchair combination, using the specified adapters where required. Prepare the frame, practise fitting the carrier empty and complete the locking checks in the instructions before transferring your baby.
Will any Joie car seat fit any pushchair?
No, a shared brand name does not establish compatibility. Confirm the exact infant carrier, pushchair model and adapter reference; do not assume a vehicle-only seat can attach to a frame.
Do I need adapters for a Joie car seat to pushchair setup?
You need adapters when the approved instructions for your exact combination require them. Use the specified reference rather than selecting a connector because it looks similar.
Can I attach my Joie car seat to a Cruise travel system?
Do not attach your Joie car seat to a Cruise frame without explicit manufacturer confirmation for the exact combination. A travel system supplied with a car seat does not establish compatibility with a different carrier.
Is an ISOFIX base the same as a pushchair adapter?
No, an ISOFIX base is part of a vehicle installation, while a pushchair adapter connects a compatible infant carrier to a frame. Each installation needs its own instructions and checks.
Can I fold my pushchair with the adapters attached?
Follow your exact pushchair's folding instructions. Remove adapters if required, and stop if the frame encounters resistance rather than forcing it closed.
Can my baby sleep in the car seat after a journey?
Move your baby to an appropriate separate sleep space after the journey rather than using the car seat as a routine sleep space. Follow safe-sleep advice and the infant carrier manufacturer's guidance.
One last thing
Before your first outing, rehearse the return transfer as well as the outward one. Finding an unfamiliar release control beside a parked car is avoidable: learn the attachment, removal and vehicle checks with the carrier empty, then keep the instructions accessible.
The useful upgrade is a repeatable, approved transfer—not simply a car seat that appears to fit.
